
When I first realized I wanted to be an author, I found that I was easily overwhelmed by the extreme learning curve I had before me. And it wasn’t just stuff you had to learn, but also execute every day after that. To keep from getting ulcers (jury is still out on that) I told myself that if I could just learn one new thing a day, I would be okay and I wouldn’t get so stressed out that I wanted to quit.
Well, that kind of worked. Ha! But I thought I would share some of the things I learned along the way on this blog.
So…
Sh!t I Learned Today: Scrivener
I seriously thought about entitling this “Scrivener, you B-,” but I didn’t think the SEO would be too good on that. Or on the actual swearing version of it. These are the kind of tips that people like Victorious are aware of, as swearing can be a detriment to many businesses, and I remember that quite often.
You know you’re a writer when…you make a lame SEO joke.
So anyway, on to Scrivener! If you’re like me, you’re a little behind on the Scrivener train. You hear people talk about it (like Veronica Roth and other famous authors aka the mirages), but you’ve never tried it for yourself, because…um…Word. But then you start seeing it more and more. Maybe you use it to make ARCs for bloggers so that you can send out ePubs and mobis. So you’re using it a little but not full-time. And then everyone just won’t shut up about it, and you realize that Word sucks balls.
Why does Word suck? Have you read my introductory Smashwords formatting post? I’ll be doing a full post on “how-to” later (let me know in the comments if this would be something you’d like!). But let me just say that Word does a lot of little nasty things that are super obnoxious. To get a clean HTML for an ebook, all those little obnoxious things need to go away.
I’m reading Write. Publish. Repeat by Johnny Truant and Sean Platt. It’s really good, and I suggest you start it right away. They also talk about how amazing Scrivener is.
So I’ve done it. I’ve gone full-time. I moved over my current finished product for editing and my work in progress (WIP) project for actual writing. It was scary…but I did it.
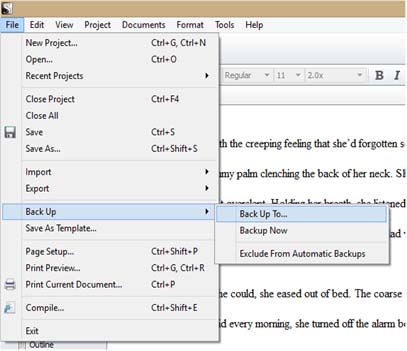
My main hold up was the fact that I didn’t understand Scrivener’s saving process. I backup my files a lot. And Word was just more familiar for that. But Scrivener auto saves like literally every two seconds. I’m not misusing ‘literally.’ It actually saves every few seconds. And then you have the option to create a backup destination (I chose a new file in DropBox), where the project will save to every time you exit the program. You can also manually backup the project, and it takes roughly 5 seconds. If you’re writing commercially or are a publisher working with clients and need to pass files back and forth, perhaps something like a client portal (like this – https://www.filecenterdms.com/info-sharefile-alternative-and-replacement.html) would be a good solution with an emphasis on safety.
I kind of digressed up there, but I want this post to be about is the basics of Scrivener. What do you need to know now to start using it?
1. You need to download the free trial. Here is the link. This is an actual day free trial. So since I used to only use Scrivener for ARCs, my trial has lasted like four months, because it only counts the days that you actually use it.
2. So now you need to start a new project. That’s easy. Just open Scrivener and say a “blank” new project. Now if you like me, and just moving over a few chapters of a WIP, I just copied and pasted. You can import Word files. I haven’t done this yet.
3. The tricky part that you need to focus on as you’re copying and pasting is the binder. WTF is the binder, you ask?
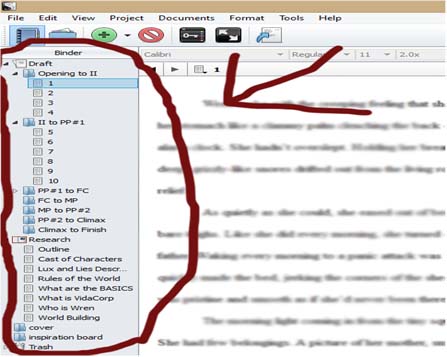
The circled part is the binder. Now look closely. I have folders named “Opening to II.” This is just how I choose to separate my WIPs. That’s opening to inciting incident. Inside that folder, there are four chapters. When you copy and paste a chapter at a time into the right folder and the right page inside that folder, the name will change to the first sentence of the text. Just double click and change it to the chapter title. I don’t think this is a big deal, because when you compile, you can add in chapter numbers and omit the way those pages are already named. This is just simpler and more organized for me. What is a big deal is that each new page or “text” is a chapter when you compile. So you need to separate them out from the beginning.
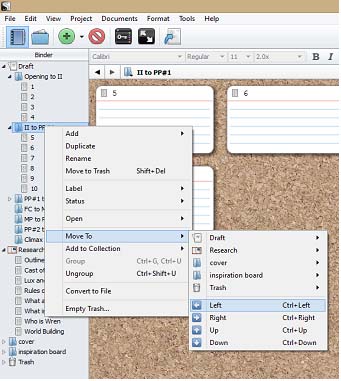
*To create folders, you can click a little folder icon down at the bottom of the page. To add pages inside a folder, there’s a button right next to the folder one. You can also add them from the top of the screen (it’s a green circle with a ‘+’ sign inside it). It is important to note that how your folders are arranged in the binder is important to how your ebook compiles. See how my folders are all aligned to the far left? And the pages fall just slightly to the right underneath them? This is important. You can drag and drop the folders into the proper position, or you can right click and say move “left” or move “right.” This took some getting used to at first.
4. If you look further down in the binder, you also see “Research.” Here, I just dragged and dropped my extra files, like my outline, cast of characters, description, etc. You can also put covers and inspiration board in here. All of which I took advantage of. When you compile your book, you can just pull the cover from inside the project file.
5. Okay, so I think that basically covered how to get started writing in Scrivener. These are just the very basics that I’ve learned. Obviously, we will all need to learn more so that we can get all fancy and stuff. But the next important thing to know is compiling, because that’s the sole purpose of using Scrivener for me. I have to have a way to make ebooks. I’ve used Scrivener to make ARCs before, but I believe it also has the ability to make final version ebooks, which is exciting for me. So on to compiling. This part kinda sucks, so hang in there with me.
*P.S. there are a lot of good YouTube tutorials on compiling, which is where I learned how to do this.
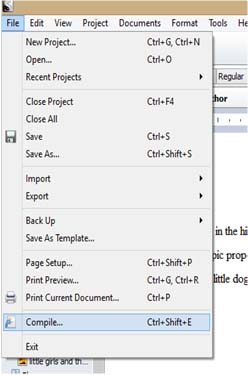
6. Click “compile.”
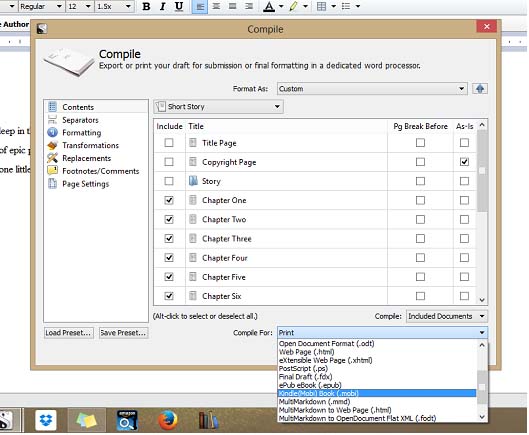
7. Now you need to choose what type of file you want. I’m choosing the ‘mobi’ option.
*****One thing I do want to point out. And if you are reading this while creating an ebook, you might have already run into this problem. When you first download Scrivener and first try to compile a mobi, it will tell you something about requiring KindleGen to do it. If you look in the picture above, you will see ‘KindleGen’ at the bottom on the left side. The directions when you click on that are pretty self-explanatory. It’s just a zipped file that you have to download and show Scrivener where it is. Super easy.
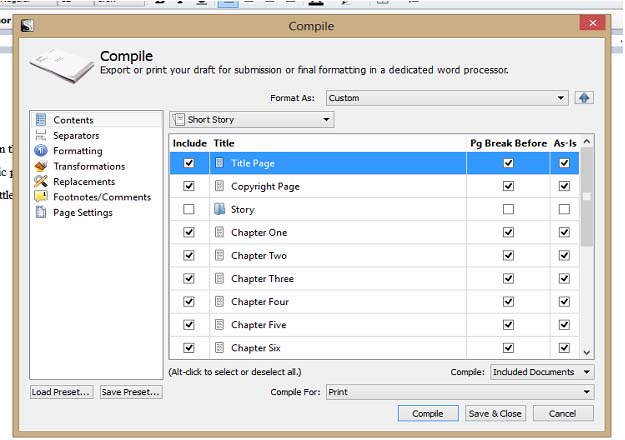
8. The next important part is choosing the contents, which you can also see in the above picture. You can see I have a title page, copyright page, and then the chapters. But look to the right. See ‘pg break before’? We need to click some of those boxes to create proper chapters and page breaks. We also need to click ‘include’ so that those text pages actually show up in the ebook. This is how I clicked them. You don’t need a page break on the “story” folder.
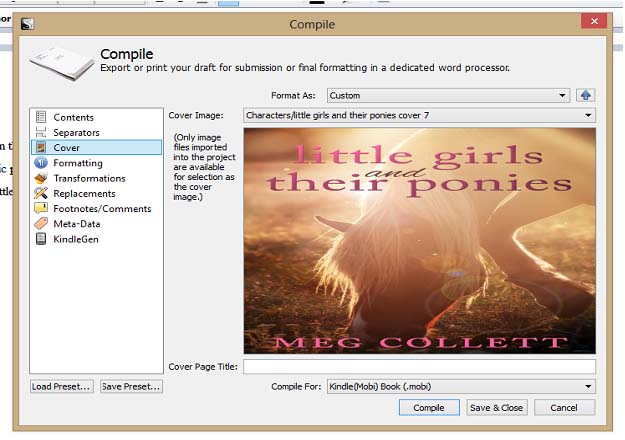
9. See how I didn’t click ‘story’? So now click on ‘cover’ to the left. This is where you will add the cover. It has to be in the project files, which is a bit odd. You can’t just pull it from another place on your computer. The cover needs to be 800×600 pixels.
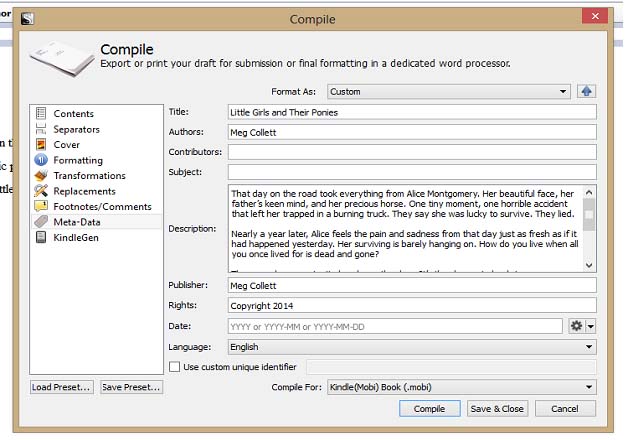
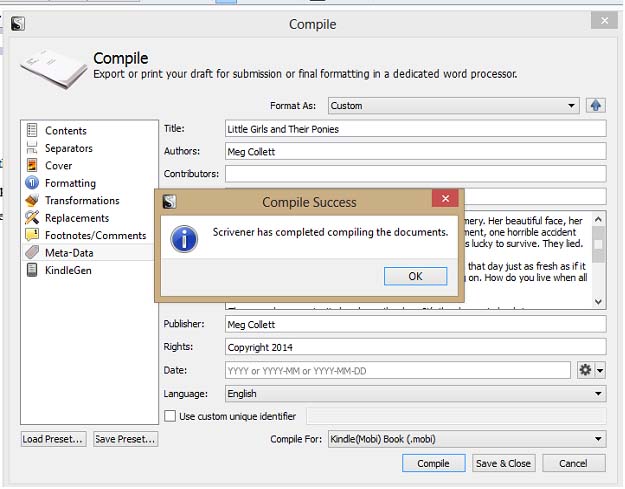
10. Now on to ‘meta-data, which is a required step for mobi files. Here’s what all I filled in.
11. So now you just hit ‘compile.’ It’ll let you choose a place to save it to. And then it will start compiling. You have to wait a minute until another pop-up comes up saying that it’s done.
Now you should have a complete mobi file saved in your computer folders! What I do next is immediately check the file. I use the “Kindle Previewer,” which you can download easily here. This is really an invaluable tool when it comes to checking your files, because it mimics the exact way a Kindle will show your book. You just go to ‘open book’ and pull up your newly created mobi file.
You also need an epub previewer. I use Adobe Digital Editions 3.0, which is also free.
Okay! So hopefully this helped. I’m really excited about all the possibilities that Scrivener holds for us. I’m excited to figure more stuff out, which I’m sure I’ll share here. Yay Scrivener!
In the comments, let me know if you use Scrivener to create your ACTUAL final ebook file versions. I’m interested to see if the HTML is actually clean enough to pull this off!